
Turing twenty-one years of age is a big deal. I’m excited that my daughter is doing well at a college in upstate New York; but disappointed that we can’t celebrate her 21st birthday with her. What to do? I decided to make a homemade cake and mail it to her along with a few presents. I made a Rice Krispie Cake. It has only three ingredients and no baking; it’s compact. Surely we can ship it. 
Birthday Party Celebrations
When our kids were young we had a variety of fun birthday parties — swimming pool parties, backyard water slides, trips to party gyms, farms with parties and sleep over parties. Summer birthdays are the best. One of our most memorable parties was at a neighborhood pool when my daughter turned 10 years old (at least I think it was 10).
I found this classic photo of family friends at the swimming pool birthday party. The family has four daughters who are now all grown–about 10 years later, all beauties with lots of brains, too. The oldest two girls attend LSU and the youngest is in middle school. Wow, time flies.
My mother-in-law often came to town for the festivities and helped decorate elaborate homemade cakes. What memories. Here’s one of my favorite cakes. 
The swimming pool is blue jello. We decorated an assortment of teddy bears for the guests and used candy and lifesavers for accents. I think that’s supposed to be a bird sitting on a dock by the life saver.
The recipe and instructions are from a Woman’s Day magazine; I still have the magazine. (Never throw away a good recipe.)
This cake went along with the backyard water slide party. It was an ordeal getting the slide into the back yard but it was definitely one of our funnest parties.
As our children got older, the parties got smaller. But we always made a homemade birthday cake.
At 21 years-of-age, birthday celebrations are a rite of passage. There are so many things you can now do (legally), hope we’ve guided our kids well. They are on their own now.
So let’s see what happens when we bake and ship a birthday cake. Here’s what I did.
Rice Krispie Cake
I decided to make a Rice Krispie Cake because I thought it could easily pack it for traveling and shipping. The recipe is the same as Rice Krispie bars, increasing the ingredients for two 9″ round cake pans. I found some empty cookie tins to use as shipping containers and cut down the layers to fit in the tins.
The recipe has only 3 ingredients and the cake is very easy to make–no baking. For the two cakes, I used one 9-oz box Rice Krispies (not two boxes), two 10 oz packages of marshmallows and 1 stick margarine (1/2 cup).
A tricky part of making the cake is melting the marshmallows. Melt the margarine in a large pot, then add the marshmallows.
Cook over low heat (to avoid burning the marshmallows), stir constantly and heat until the marshmallows soften and turn to syrup. This took about 10 minutes.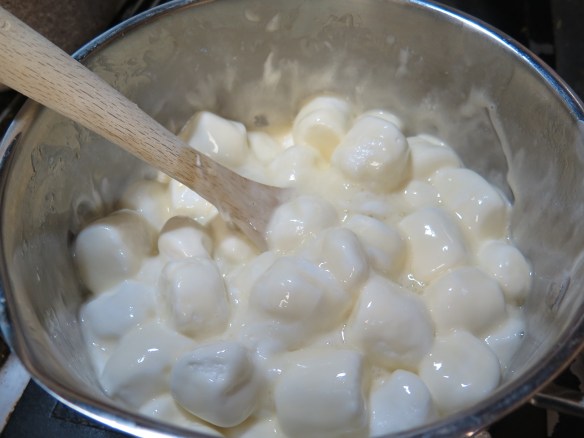
Divide the box of Rice Krispies into two large bowls. Then spread the completely melted marshmallows over the Rice Krispies. 
At this point, things are very sticky. Stir to coat the marshmallows completely and pour into two buttered cake pans. (Butter the sides, too.) I coated wax paper with Pam non-stick spray and pressed down on the Rice Krispie cakes to compact the layers. I still ended up with Rice Krispies all over my hands and clothes, too! Let the cake layers cool; they are less sticky. Use a knife or spatula to loosen the layers and invert onto wax paper. The Rice Krispie layers can be molded and loose cereal can be pressed back onto the layers.
For the second layer, I used a knife to cut it down to the size of the cookie tin which was used for a shipping container. And I added some powdered sugar icing to the sides so the candies would stick on.
I iced the top of the cake, too, and immediately decorated the cake with an assortment of candies and decorating pearls and sprinkles. The icing hardens so you must decorate quickly so the candies will stick on. Time for photos.
Then I dissembled and cut off the top layer using a large knife.
The layers were placed into the cookie tins and sealed tightly with saran wrap. I left wax paper over-hanging so the layers could be removed from the tins.
Then everything was placed into shipping boxes. Off they went to upstate New York.
Don’t you want to know what are in the boxes? It’s a secret, but I’ll tell anyway. We packed lots of Zapp’s potato chips; made in Louisiana and a favorite snack. The little wrapped package contained an intricate hand-beaded necklace and earrings make by a local friend and artist. The second package contained a Swiss Army knife with lots of attachments. This knife has multiple uses with tweezers, can opener, cork screw as well as the usual blades. My dad always carried a tiny knife in his pocket and he used it many, many times. I especially suggest carrying a small pocket knife when traveling. Yes, you are on your own now; be prepared.
And we got our daughter a bike for her 21st birthday. (This was not in the boxes.) How great that she loves the out-of-doors and taking biking rides around the countryside. Here she is at Lake Ontario. Hope she will enjoy this recreation for years to come and will keep a healthy and active life style.
Happy 21st birthday.
Rice Krispie Birthday Cake
Ingredients for cake:
- 1/2 cup margarine (not diet margarine), plus extra for buttering cake pans
- 2 (10 oz) packages regular-size marshmallows
- 1 (9 oz) box Kellogg’s Rice Krispies (or 9 cups Rice Krispies)
- assorted decorating pearls, chocolate sprinkles, red hot candies and M&N candies,
- non-stick spray
Ingredients for icing:
- 1/2 cup margarine
- 3 cup powdered sugar
- 1 tsp vanilla
- dash salt
- 6 Tbsp milk
Instructions and Steps for Rice Krispie Cake:
- Add margarine to large pot and melt over medium heat.
- Turn heat to low, add all the marshmallows. Stir frequently until all the marshmallows are melted. This takes about 10 minutes.
- Divide Rice Krispies into two large bowls.
- Pour the melted marshmallows over the Rice Krispies, dividing evenly between the bowls. Stir to combine until all the Rice Krispies are coated.
- Use additional margarine to lightly butter the bottom and sides of two 9″ cake pans. Pour the Rice Krispie mix into the cake pans.
- Cool slightly so that the Rice Krispie mix can be handled. Lightly spray wax paper with non-stick spray such as Pam brand. Place this on top of the cakes and press down to compact the Rice Krispies.
- Cool to room temperature.
- Use a knife or spatula and loosen the sides and bottom of one of the layers. Invert onto cake plate. Press any loose cereals back onto the cake. (This may be easier if you slightly butter your fingers.)
- Ice this layer. Then loosen and invert the second layer onto a cutting board. With a knife, cut about 2″ from the perimeter of the second layer. Then place on top of the first layer. Ice this layer.
- Working quickly before icing hardens, press decorating pearls and red hot candies on top of the cake. Decorate the sides with chocolate sprinkles and M&N candies. Use a spare candle to make holes where the candles will go.
- Let the cake cool. Best served the same day.
Instructions and Steps for icing:
- In medium bowl of electric mixer, add margarine and powdered sugar. Cream together on medium and high speeds.
- Add salt and vanilla extract.
- On low speed, add milk and mix until creamy and smooth.
- Ice cake before icing hardens.


